In this
section of the Bowling Coach, I will break down the bowling four step approach
step-by-step, starting with the stance through to the finish position. When
studying each position, pay close attention to the feet's movement and relate
this to the position of the bowling hand in the arm swing. I have numbered each
foot movement to the corresponding hand position.

In
position 0:0, your arm moves out forward as your right foot moves out. Remember
to move your right foot under the ball.
During
the stance, you want your body to be in a relaxed, but sturdy position. Your
knees should be bent approximately 15 degrees and the spine should be inclined
forward 15 degrees.
Notice
the position of the feet (0 position) to the position of the bowling hand (0
position). We will follow this numbering system throughout the approach.
The
height you hold the ball depends upon your bowling tempo. The ball should be
placed somewhere between waist and chest high toward the right side of the body
(left side for left-handers). Your bowling hand should grip the ball from
underneath and the opposite hand also should support some of the weight of the
ball. Faster bowlers hold the ball lower in their stance than slower bowlers.
Find the position that is right for you, somewhere between the chest and thigh
level.
When stepping
onto the approach you will notice two rows of dots. The dots in the back row is
15 feet from the foul line while the front row is 12 feet away. These dots are
useful for measuring your starting position. For beginners, your shoulders
should be 90 degrees to the bowling target. Your wrist needs to be fairly firm
and straight. Your bowling arm's elbow needs to be kept as close to your hip as
possible. Your knees should be bent slightly and feet pointed towards the pins.
Bowling Step 1: Position 1:1

In position 1:1, maintain good posture and balance. At this point, you will have
one foot in front of your body and one foot behind your body. During the first
step, the right foot steps forward as the right arm pushes the ball out and down
toward the right foot simultaneously.
At the end
of the first step, the ball should be poised above the right foot. The left hand
should continue to help support the ball throughout this step.
Note:
If you bowl left-handed, move your left foot forward as the left hand pushes the
ball out toward the lane and over the foot.

In position 2:2, when your hand is beside your right knee, go with the swing and
move your left foot forward. Your arm comes down towards your ankle. Release the
bowling ball at your ankle and your arm should go up towards the ceiling. This
is called lift. Your arm swing should be a half circle. Follow through after the
foul line to complete the half circle. During the second step, the left foot
moves forward as the ball arcs down. The right hand should leave the ball at the
beginning of the step. At the end of the second step, the ball should end up
beside the left calf.

In
position 3:3, the bowling ball goes up into the backswing and third step while
still maintaining posture. Your arm is at the top of the swing and the left leg
is back.
During
the third step, the right foot moves forward as the ball arcs back to the
highest point of the arm swing. This should be about shoulder height.

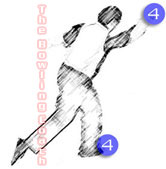
In position 4:4, you go with the slide and follow-through. After the fourth
step, you should continue through the release and follow-through without
hesitation. As the ball starts down during the fourth step, your right foot
should slide sideways in back of the left leg. Simultaneously, you should “sit
down” or lower your hips slightly and position your weight slightly back so
you end up in a comfortable sitting position with the lower body and the spine
tilted 15 degree forward.
If you can count the 4 steps, you can get good timing and become a really good
bowler.
You want to
avoid early timing and late timing. Early timing is where the ball gets to the
foul line way before your foot. Late timing occurs when your foot gets there
before your swing. You may want to record yourself bowling and see whether you
have good timing. Some people prefer the 5 step approach where they get a little
baby step with their left foot to help them get started and get their body in
motion, but ball does not move.
Make sure you do not slide over the foul line during the fourth step. If you
slide over the foul line during competition (and release the ball), you receive
no points for the shot.
The Finish
Position

In the finish position, your leg should be planted in front of the knee and
should be bent further, at approximately a 45 degree angle. The spine, however,
remains at a 15 degree angle forward. From the side view, you want to keep your
nose, knee, and foot all in line with each other. When you slide to the line,
you want to have a straight line with the nose, knee and toe. This way, you will
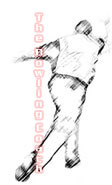
generate a lot of power. From the back view, you want your right leg over, right
arm up, and left arm out for balance. There should be a straight line from your
head right down through the body and to the slide foot. You should also have a
diagonal line across the body with the right leg over, and the right arm up for
good balance.